Tuesday, March 16, 2010

Fine Art Template


1. Tree: 2.6.10 @ 1:20 p.m.; Ucon, Idaho; f 6.3; /1600; Canon EOS Digital Rebel XS
2. Tire: 3. 3.10 @ 10:30 a.m.; Dubois, Idaho; f 4.5; 1/125; Canon EOS Digital Rebel XS

To create the fine art template, I opened a white Photoshop document. I then added a rectangle. I copied that rectangle four times and center aligned them. I then added a photo behind the rectangles. This was a very simple, yet professional way to show off a photo.

Tuesday, March 9, 2010

High Dynamic Range (HDR)


Stairs (overlay): 3.3.10 @ 4:40; Bannack, MT; f 4.5; 1/40; Cannon EOS Digital Rebel XS
1. Stairs1: Exposure -2
2. Stairs2: Exposure 0
3. Stairs3: Exposure +2
4. Scratches: 3.3.10 @ 4:45; Bannack, MT; f 5.6; 1/5; Cannon EOS Digital Rebel XS
Chair: 3.3.10 @ 3:40 p.m.; Bannack, MT; f 4.5; 1/50; Cannon EOS Digital Rebel XS
1. Chair1: Exposure +2
2. Chair2: Exposure -2
3. Chair3: Exposure 0

For each completed photo, I used Dynamic Photo to compile the three different exposures to create one image. I also added the scratches as an overlay for the stairs photo. I didn't use a tripod on that photo so it was a little blurry, the scratches were also blurred, but I thought it turned out to look pretty good.

Bannack, Montana


1. Building: 3.3.10 @ 10:30 a.m.; Dubois, ID; f 5.6; 1/400; Canon EOS Digital Rebel XS
2. Organ: 3.3.10 @ 3:20 p.m.; Bannack, MT; f 5.6; 1/8; Canon EOS Digital Rebel XS
3. Spoons: 3.3.10 @ 3:25 p.m.; Bannack, MT; f 5; 1/125; Canon EOS Digital Rebel XS
4. Paige: 3.3.10 @ 3:45 p.m.; Bannack, MT; f 5.6; 1/15; Canon EOS Digital Rebel XS
5. Andrew: 3.3.10 @ 3:40 p.m.; Bannack, MT; f 5.6; 1/80; Canon EOS Digital Rebel XS
6. Ghost: 3.3.10 @ 4:15 p.m.; Bannack, MT; f 11; 6 seconds; Canon EOS Digital Rebel XS; tripod used

In each photo I adjusted levels and saturation. I used gradient map and channel mixer to make the spoons photo black and white. In the ghost photo, I used a tripod. Paige stood in the photo for about 3 seconds, then ran out. The camera only caught an outline of Paige creating a ghost like effect.

Tuesday, March 2, 2010

Photolusion Blend


1. Jordan: 2.28.10 @ 11:25 a.m.; Rexburg, ID; f 4.5; 1/40; Canon EOS Digital Rebel XS
2. Apple Jacks: 2.28.10 @ 11:15 a.m.; Rexburg, ID; f 5.6; 1/40; Canon EOS Digital Rebel XS
3. Don't Eat Me

I found my creative inspiration for this photo from the movie "Honey I Shrunk the Kids." I thought it'd be fun to make my own version. First I took a photo of a bowl of Apple Jacks ready to be eaten. Then I took a photo of my husband, Jordan, pretending as if he was about to be eaten. I took it of him kneeling on the floor while I stood on the couch to give the appearance that he was being looked down on. Then I cut out Jordan's body in Photoshop and placed him in the spoon.

Photolusion Straight

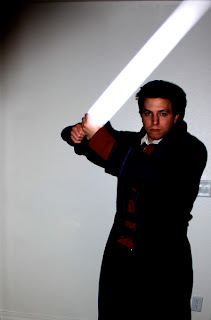
Jedi: 3.2.10 @ 6:30 p.m.; Rexburg, ID; f 4; 1/60; Canon EOS Digital Rebel XS

For this photo, I placed a stick of pencil lead right in front of the camera lens. Then, I had my "Jedi" place himself so it appeared as if he was holding the lead. I took the photo with the flash. This lit up the lead, making it appear to be glowing. I adjusted the levels to be much darker than they would usually be set. This gave the photo a dark feeling...it also covered up the fact that he looked a little more like Harry Potter (with the purple robe and red/black striped polo) than a fearsome Jedi night.

Tuesday, February 23, 2010

Borders


1. Grow: 1.22.10 @ 9:30 a.m.; Rexburg, ID (BYU-Idaho Greenhouses); f 7.1; 1/50; Canon EOS Digital Rebel XS
2. Live: 10.15.09 @ 10:25 p.m.; Rexburg, ID; f 3.5; 10 seconds; Sony DSC-H20

To create the burned border, I multiplied the image, making it darker. Then I used the marque tool to cut out the center. I then added a yellow border and the word "grow."
For the vignette, I added a black layer and used the marque tool to delete a square section from the middle. I then added a blue stroke to give it color.

Night & Light


1. Street: 2.13.10 @ 8:25 p.m.; Salt Lake City, UT; f 29; 25 seconds; Canon EOS Digital Rebel XS
Used a tri-pod and self timer.
2. Live: 10.15.09 @ 10:30 p.m.; Rexburg, ID; f 3.5; 10 seconds; Sony DSC-H20
Used a tri-pod and key chain light to "draw on wall."
3. City: 2.13.10 f@ 8:30 p.m.; Salt Lake City, Ut; f 22; 25 seconds; Canon EOS Digital Rebel XS
Used a tri-pod and self timer.
4. Blue Light: 2.20.10 @ 8:45 p.m.; Idaho Falls, ID; f 4; 1 second; Canon EOS Digital Rebel XS
5. Purple Light: 2.20.20 @ 8:40 p.m.; Idaho Falls, ID; f 4; 1 second; Canon EOS Digital Rebel XS

On each photo I adjusted the levels. On the "blue" and "purple" photos, I adjusted the saturation to make the yellow/white light another color. For those two photos, I simply spun around while I took the photos. This made the light look like streaks.
In the "Live" photo, I quickly wrote the word "live" on the wall. Because I did it so quickly, it left hand streaks. I thought it turned out to be a neat effect.

Tuesday, February 16, 2010

Photomerge


I really liked this photo. It turned out really huge, but I couldn't decide on how to crop it...so I didn't. If I were to use this for anything, I would definitely have to crop it smaller, so any suggestions on what to cut out would be appreciated! This was a fun project, I took a ton of different panoramics, so it was hard to pick just one.
P.S. Sorry this is so small! If you click to enlarge it, you can see it much better...but it's still little!

Panoramic


Downtown Salt Lake: 2.14.10 @ 9:00 p.m.; Salt Lake City, UT; f 4; 4 sec.; Canon EOS Digital Rebel XS
I used the manual setting to set the f-stop at a low number and the shutter speed to a longer exposure. I also used a tri-pod and set the timer for 2 seconds to avoid any camera movement. I slightly adjusted the levels and saturation to give the photo contrast.
This was taken from the top of my brother's apartment complex in Salt Lake City.

Tuesday, February 9, 2010

Template


I created my own template in Photoshop. I was tempting a classy look, at first, but I'm a person who can't go without color. So, I decided to add the bright 80's colors to liven it up a bit. I like the way it turned out, except for Saturday's picture. It was a vertical photo being placed in a horizontal frame, so I ended up having to cut out most of the picture. I also now realize that the white font is a little difficult to read on some photos, so I would probably change that if I were to use this in my book.

Daily Photo Journal


Monday: 2.8.10 @ 7:30 p.m.; Rexburg, ID; f 5.6; 1/60; Canon EOS Digital Rebel XS
Tuesday: 2.2.10 @ 7:00 p.m.; Rexburg, ID; f 4.5; 1/40; Canon EOS Digital Rebel XS
Wednesday: 2.3.10 @ 8:00 p.m.; Rexburg, ID; f 4.5; 1/60; Canon EOS Digital Rebel XS
Thursday: 2.4.10 @ 9:00 p.m.; Idaho Falls, ID; f 5.6; 0.3; Canon EOS Digital Rebel XS
Friday: 2.5.10 @ 1:15 p.m.; Idaho Falls, ID; f 5.6; 1/1000; Canon EOS Digital Rebel XS
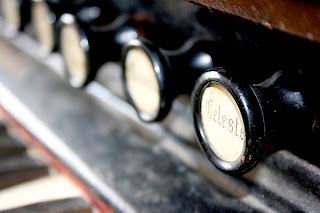
Saturday: 2.6.10 @ 1:45 p.m.; Idaho Falls, ID; f 18; 1/200; Canon EOS Digital Rebel XS

Sunday: 2.7.10 @ 2:05 p.m.; Idaho Falls, ID; f 6.3; 1/1600; Canon EOS Digital REbel XS

This was a challenging assignment. It was hard to take a picture everyday and make them completely different. I've noticed that I am most comfortable taking macro shots, so I took a lot of those. Then, I realized most of my shots were macro, so it was a good challenge for me to try to take lots of different compositions. I didn't do much more than change the levels and sats on the photos. However, on Monday's photo I did add a bit more blur to the background.

Tuesday, February 2, 2010

Enhancements & Color Replacement


Sam: 1/30/10 @ 3:00 p.m.; Idaho Falls, ID; f 5.6; 1/30; Canon EOS Digital Rebel XS
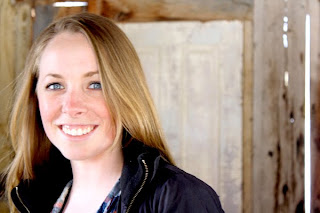
Cami: 2/12/09 @ 5:00 p.m.; Rexburg, ID; f 4.2; 1/65; Nikon Coolpix L11

In the photo of Sam, I enhanced his eyes. I followed a tutorial I found on line to make the eyes more sharp and contrast with the skin. I also used the healing tool to take away the red bags under his eyes. In the photo of Cami, I changed the color of the snow to a brown color. I wanted to see if I could make it look like she was standing in mud instead of snow. I don't love the way it turned out. I had a hard time making it look natural.

Portraits


Sam: 1/30/10 @ 2:30 p.m.; Idaho Falls, ID; f 5.6; 1/30; Canon EOS Digital Rebel XS
Cooking: 1/30/10 @ 3:00 p.m.; Idaho Falls, ID; f 6.3; 1/15; Canon EOS Digital Rebel XS
Madison Lights: 1/30/10 @ 4:45 p.m.; Idaho Falls, ID; f 5.6; 1/320; Canon EOS Digital Rebel XS
Cami: 2/12/09 @ 5:00 p.m.; Rexburg, ID; f 4.2; 1/65; Nikon Coolpix L11

I thought this would be an easier assignment, but I've found that it's much harder. It's so hard to make your camera and the subject work together. Also, people tend to be much more camera shy than inanimate objects. But I tried to take a few candid shots, and I think they came out pretty well. I had the most problems with the group photos. It was hard to get a photo where everyone looked good.